Friday, June 29, 2012

Lemon Meringue Tartlets


I'm so happy, I've finally made a meringue that works! I used to play around with the French meringue because it's so easy to make, but its also unstable.  I once tried it on a lemon tart and had the problem of it turning into an oozy mess.  I’ve also tried the Italian meringue, it’s how I make my macarons but for some reason, it’s always turned out runny, beautifully glossy but runny.  I’m not complaining because my macarons still turn out well, but the Italian meringue on its own wouldn’t hold, it just never obtains firm peaks.  Can someone please tell me where I’m going wrong, it drives me bananas!!  But then I tried the Swiss meringue for the first time, and it works! Yay it works! To make the Swiss meringue, I beat the caster sugar and egg whites over a bain marie on low speed until it reaches around 60 degrees, and then I take it off the bain marie and increase the speed and beat until the meringue cools to around 35 degrees.  Oh and yes, I have a new digital thermometer now! Life without a digital thermometer just didn’t feel right! Let’s hope we don’t have a second drowning.
So voila, lemon meringue tartlets!  Haha, well not quite! For the filling, I used a lemon curd recipe. I was planning on using one of the most famous lemon curd recipes out there (of course by Pierre Herme), but I’ve been using Guillaume Brahimi’s for a while now which has always been a winner with me, so why rock the boat? Brahimi calls for the addition of gelatine, which is fine except that when you have leftover filling, you can’t do much with it because it sets so firmly and so I end up throwing it out.  Being Asian, that goes against every grain in my body!  I omitted the gelatine this time but I was a bit worried the filling wouldn’t be firm enough.  As it turns out that the addition of cold butter is what will help make the curd set. 
I love how the curd holds its shape, they’re such cute little round domes.  I always wondered how the French patisseries managed to get such beautiful domes on their tarts and now I know! I was so impressed with how they turned out, I was going to leave the lemon tartlets as is.  But then I thought that if I was going to leave it "as is", then I'd want the curd to really glisten just like in the French patisseries, so to give it some shine, I glazed half of the tartlets with an apricot glaze. But the pastry brush left these nasty streaks on the curd. Arghh! So I decided to hide those nasty streaks by making a meringue.
 
As for the pate sucre, I really love Brahimi’s recipe.  It’s got a beautifully buttery taste to it, like shortbread, I could just eat it on its own or with a nice cup of coffee! Yum! 
I thought the lemon tartlets tasted great on their own, but when I added the meringue, they were divine!  I imagined the meringue would add a sickly sweet taste to the tartlets, but it didn’t.  As I love the zing of a lemon tart, I would add a little bit more lemon next time.  
I piped the meringue a little too high which makes eating it a bit of a messy affair! Amongst friends, there is no shame in having your nose dipped into a bit of meringue with each bite full, but if you’re there to impress, well I would avoid this! Or you could just use a fork! But who wants to use utensils when these are miniature size!
P.s.  What a momentous month of baking and blogging! Let's hope I can keep it up next month!


Friday, June 22, 2012

Chocolate Joconde Imprime Cake


When my husband (I’ll call him “C” from now on) first suggested the idea of blogging to me, my first reaction was absolutely no way! I was only a recreational baker and aside from my creations sometimes turning out to be complete disasters (and quite frankly, who wants a permanent record of all their failures), I was fearful that my desire to bake would quickly wane as I put pressure on myself to post on a regular basis.  I don’t know what made me change my mind about blogging, but whatever it was, I’m so glad I did because I’ve never felt more motivated to bake!

Anyway, I digress.  The point of the story is that on the long weekend, I went on a baking spree given my new found baking motivation.  So I baked this chocolate joconde imprime cake and I’ve been dying to post about it! Firstly, what the hell is a joconde imprime? That was my initial reaction!  Aside from sounding utterly pompous, I had no idea what it was.  I happen to stumble upon it because I was searching for a simple entremet to bake, which leads to the second question, what the hell is an entremet? I discovered it’s a mousse cake with various layers and textures.  I’ve been meaning to attempt a layered mousse cake for a while now, but I have never felt daring enough, but who would have thought my love of saying “entremet” was all the push I needed!  You can ask C, but I spent all weekend trying to fit “entremet” into everyday vocabulary (I don't even know how to pronounce it properly so I'm sure I sounded like a complete tool and really, how easy is it to fit entremet into everyday vocabulary).  Anyway, to make this particular entremet, I needed to make a joconde imprime, which as it turns out, were my second favourite words to utter that weekend.

This was a true challenge for me, in baking a joconde imprime and placing it in miniature round moulds.  As it turns out, the joconde imprime is really not as difficult as it looks and what I love about it is that you can be as creative as you want with the chocolate decor paste.  I opted for something simple and classic, but you can really jazz up the patterns if you wanted to and colour the decor paste differently, like pink if you were going to have a strawberry mousse filling.  What I found tricky was trimming the joconde imprime down to size and fitting it into such small moulds.

As for the filling, I made a cheat’s version of a mousse.  After fiddling around with the joconde imprime so much, I just didn't have the energy to faff about with so many ingredients making a mousse.  So I whipped up a chocolate Chantilly cream which you could easily mistake for a mousse.  As mentioned before, I was hoping to create several layers to call this an entrement, and I was hoping to make a darker chocolate Chantilly cream but we didn’t have any darker couveture chocolate left, so I was left with a single layer of cream.

 
The joconde on its own is not very sweet so the cream filling balanced very nicely with the joconde. And I am a huge fan of the chocolate Chantilly cream!  When pressed for time, it really is a good substitute for mousse.
 
I was still determined to get some type of a layered effect, so with the second mould, I added a layer of chocolate ganache.  I don’t think it looks as pretty as the direct contrast between the two horizontal layers with the two slanted vertical lines of the sponge is visually a bit “off”. However, the ganache complemented the chantilly cream and joconde really nicely, adding another element and sweetness to the cake.  I'll have to figure a way to incorporate the ganache in a visually appealing way next time!


Still not satisfied that I hadn't managed to achieve a true layered effect, I was determined to go for it particularly because I had left over joconde, which was beginning to dry out.  C made some praline a few days before so it was perfect for me to make use of it.  I tried a chocolate hazelnut entremet with layers of chocolate hazelnut chantilly cream, praline and finally a layer of chocolate chantilly cream.  The flavours were definitely there, but the presentation was sadly awry. You can see the layers are all wonky! I still have a long way to go to get the layers perfectly finessed.  

 P.s. Can you tell yet how much I love the words “entremet” and “joconde imprime”?!  

Tuesday, June 12, 2012

Raspberry Cheesecake Delice


I love raspberries! There’s nothing like devouring a whole punnet of fresh raspberries! Given they’re not in season now, I'm left working with the frozen variety.

For a while now, I’ve wanted to make a raspberry glaze but didn’t know what to glaze it with so I turned to my trustworthy cheesecake recipe.  This recipe is so yummy, I could eat the batter on its own and once baked, it has that beautiful smooth and velvety texture of a New York cheesecake.  However, I've always had trouble with cracks appearing in the cheesecake.  In fact, the first time I baked it, my husband had turned to me and said, “I don’t think it’s supposed to have cracks in it” to which my response was, “nonsense, all good cheesecakes are meant to have cracks!” Ummmm, they're not! 
So this time, I wanted to get it right. Unfortunately, it was never meant to be as I was having a completely OFF day in the kitchen!

Firstly, we didn't have any digestives in the cupboard to make the biscuit base but instead had some crumbly tasteless wheat biscuits, so the base was lacking that oomph (I completely missed the buttersnaps hiding in the back of the cupboard, doh!).  I then decided to halve the recipe because I was only making miniature ones but of course, I didn't halve the amount of eggs required so the batter was extra runny (it still tasted good).  Then, the biggest mistake of all, I didn't let the cream cheese soften, HUGE rookie mistake! Arghh! Lacking in time (and ingredients), I couldn't bring myself to start all over again, and besides, the main reason for making the cheesecake was to use the raspberry glaze and to see if I could bake a cheesecake without any cracks appearing.     

With regards to cracks, to take the guesswork out of it, a baked cheesecake is set when it reaches 66 degrees.  Unfortunately, I killed my digital thermometer a few weeks ago, completely forgetting that I couldn’t get the battery wet (it ended up being washed with all the dishes).  This was also another sign that my cheesecake was doomed to fail.  Seeing the centre still wobbly made me doubt it was ready, but I followed all the literature and turned the oven off despite the wobbly centre.   To avoid the cheesecake deflating, I left the oven door ajar so that it could continue to set and despite the little indent in the middle, I was quite happy with the result.  At least I got one thing semi right!

The raspberry glaze was surprisingly very easy to make!  After all the effort, I'm not really sure the addition of the glazed texture was necessary, however I do find it visually appealing so will keep it next time for that reason. And next time, it would be a lot easier to make a non-bake cheesecake, and that way I wouldn't have to worry about any indents in the middle of the cake! Aahhh, the beauty of hindsight!

Friday, June 8, 2012

Chocolate Raspberry Macarons

After the success of my salted caramel popcorn macarons, I had a renewed vigour to tackle a different flavour.  The dreaded chocolate macarons.  Dreaded because my good friend described my last attempt as, “not so much like a macaron but a flourless chocolate cake”. Ouch! So I turned to my trusty bible by Pierre Herme and thought, this has to be fool proof.  

Fool proof it is not!  Sadly, I was somewhat disappointed with how this batch turned out.  They were less smooth and glossy like the salted caramel popcorn batch and had slightly less crunch.  Pierre Herme calls for the oven temperature to be at 180 degrees whereas I’ve always baked my macarons around the 140 – 150 degree range and continued to do so.  However, I think next time I will preheat the oven to around 170 degrees and then drop it immediately down to 140 when I place the trays in, which should ensure a firm crisp shell, but will also cook the macaron through without burning them.  I think I will also tweak the recipe slightly and add a little bit more egg white to the mixture which should help make the macarons smoother as the mixture wasn’t very runny as previous successful batches.
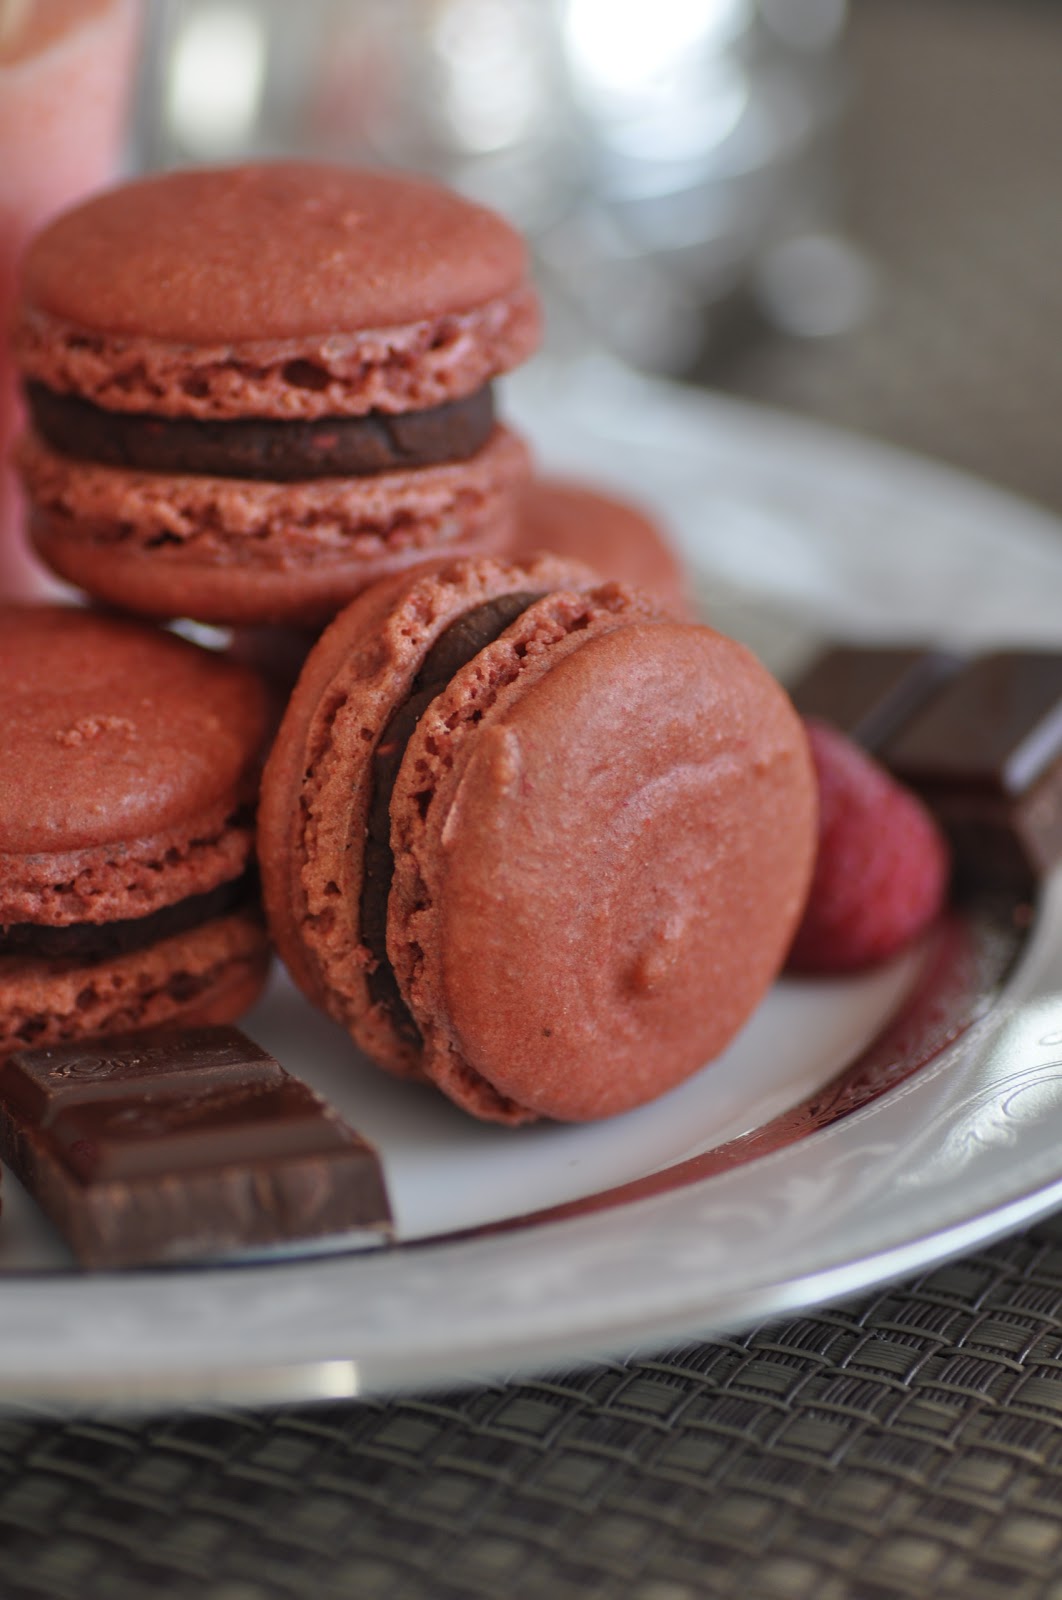
I was also slightly underwhelmed by the colour of the macaron.  In Pierre’s book, his macaron is a beautiful chocolate brown whereas mine come out like the colour of raw minced meat (not very appetising particularly for a vegetarian like me)!  I figured that’s because he calls for 100% strength dark chocolate to be folded into the mixture which should offset all that red food colouring, however I only had 45% strength dark chocolate in the cupboard. 

The red hue of the macaron didn’t quite scream chocolate flavour but I figured the addition of raspberries might explain the reddish tint.  Thankfully I had some frozen raspberries in the freezer which I added to the chocolate ganache.  And besides, raspberries go so well with chocolate, that this turned out to be a happy accident! The taste reminded me of a cherry ripe, without the coconut, yummo! 

Recipe based on Pierre Herme’s Macarons (note Pierre Herme uses a lot of couture ingredients, which I haven’t repeated below)

For the almond mixture:
150g ground almonds
150g icing sugar
55g egg whites (aged)
60g dark chocolate 100% cocoa
7.5g red food colouring

For the Italian meringue:
150g caster sugar
37ml water
55g egg whites (aged)

For the raspberry chocolate ganache (this is my own recipe):
150ml pouring cream
200g dark chocolate
35g softened butter
Approx 3/4 cup of raspberries

Melt the dark chocolate in a bowl over a pan of barely simmering water until it reaches 50 degrees and set it aside.

Process the almonds and icing sugar in a food processer until it is fine.  Stir the food colouring into the first portion of the egg whites and then pour it into the processed almonds and icing sugar, but do not stir the two together.

To make the Italian meringue, bring the water and sugar to boil to 118 degrees.  When it reaches anywhere between 110 to 115 degrees, whisk the second portion of egg whites to soft peaks on a medium speed.  You’ll need to time this correctly so that when the sugar reaches 118 degrees, it is ready to be poured over the egg whites. Continue to whisk on medium speed and then increase the whisk to high speed for the last few seconds. 

Fold the meringue into the sugar almond mixture, and then fold in the melted chocolate.  Spoon the batter into a piping bag with a plain nozzle and pipe.

Preheat the oven to 180 degrees and then put the shells in the oven and bake for 12 minutes.  Personally, this temperature is too high for my oven, so you will need to figure out which temperature works best with your oven.  However, most macaron recipes will say set the temperature anywhere between 140 to 160 degrees and have the macarons baking anywhere between 15 to 20 minutes.

To make the chocolate ganache, bring the pouring cream to the boil and take it off the heat.  Add the chopped up chocolate and the softened butter into the cream and stir until combined.  Leave it to set in the fridge for around 2 hours until it has hardened slightly but still pliable.  Then add the raspberries to taste.  If you find the raspberries have made the ganache too runny to pipe, put it back in the fridge to set slightly.  Pipe the ganache onto the shells and top with remaining shells.