Sunday, December 15, 2013

Gingerbread Train

I cannot believe it's mid December already, seriously how did that happen?!  

So the countdown to Christmas is on and I've been bitten with the Christmas bug this year! Yes, I am one of those people I would normally roll my eyes at who already had their Christmas tree up and decorated before December even began (in all fairness though, the tree was put up on 30 November, so I wasn't that bad)! And if there was a Christmas Tree Ornaments Anonymous, I would be there.  The amount of money that I've spent buying Christmas ornaments this year is phenomenal.  At around $4 a pop, I'm too frightened to even want to know how much this year's Christmas tree cost me!
So with all the must-do's out of the way, all that was left, in Christmas readiness this year, was bake!  And bake I did!
I half regretted last year not embarking on some crazy Christmas themed project - the scars from the year before were still raw!  The scars have fully healed now and I couldn't wait to get started on this gingerbread train.  Little girl loves trains, she is absolutely obsessed with them so I couldn't wait to see her reaction when this was all done! 

So the first thing I had to do was to get the paper cuts ready.  This took a bit of brainstorming, I mean, I didn't want just square and rectangle structures.  I needed a cylinder for the front carriage and something cone shaped for the chimney.  
I ended up using a metal cylinder mold which I covered in foil and then wrapped the gingerbread around. And for the chimney, I used one of my metal piping tips and did the same thing as the cylinder.  Once the gingerbread was baked, I gently removed the gingerbread from the molds and voila, you have all these wonderful shapes to play with instead of just squares and rectangles.
I wanted each carriage to look like a sleigh and used candy canes as the bar handles.  As you can see, this is one "girly" train, with all the pink, the red and the love hearts! My kind of train!
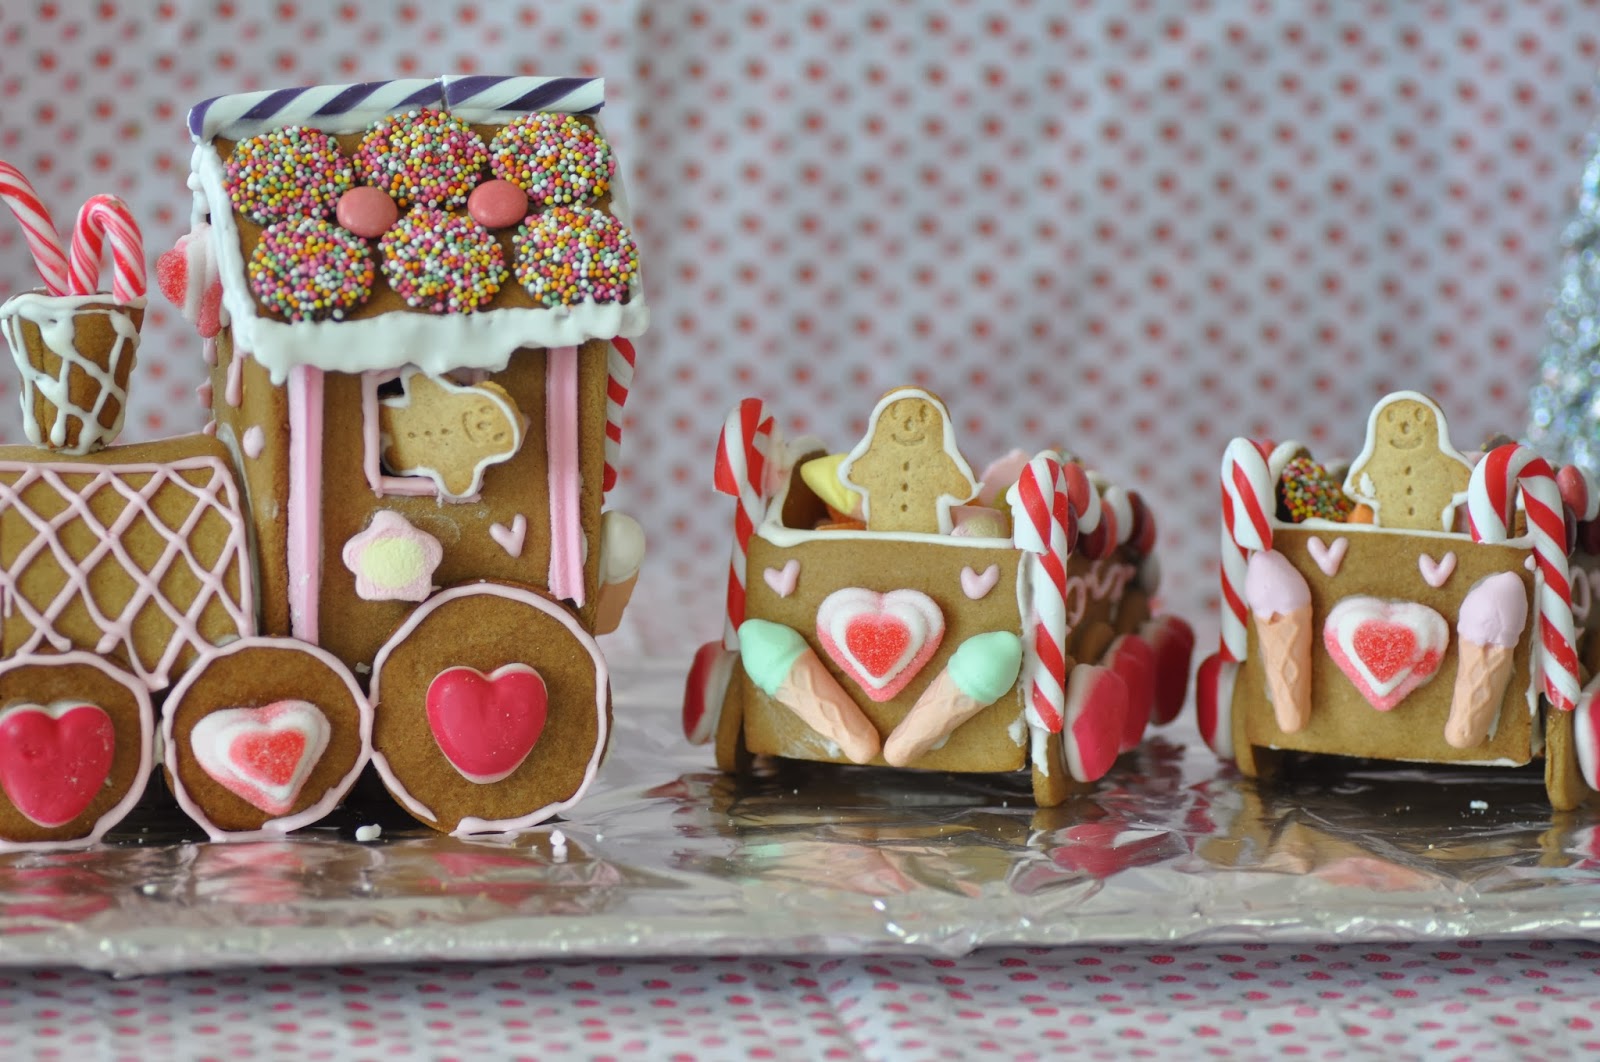
 A pic of the back of each sleigh carriage - love hearts galore!
   Love heart candy canes
  Love heart train stop
These freckles are meant to be mushroom stools.  C came up with this idea many years ago and I can't help but use it in all my gingerbread structures - they're just so damn cute!
Chocolate sticks train tracks

And finally, the train wouldn't be complete without a conductor! Little Organics kindly gave me a bag filled with goodies including a box of mini gingerbread men for little girl.  I stole a few to decorate the train with! 
So all that is left to do is dig in! Because I baked this gingerbread to eat (as opposed to previous years which was more for looks), the gingerbread is quite soft, which means that the structural integrity has been compromised a little! Each carriage is supported by the wheels alone and I've already had 4 of the wheels break in half on me! Luckily I had two spare, so I could easily replace them, but then when the last 2 broke, I had no choice but to glue them together and stick a love heart on and hope for the best!  Well, the train hasn't collapsed yet, so fingers crossed!
Little girl has already stolen a few lollies from the carriages!


Thursday, October 3, 2013

Black Magic Cake with Rose Macarons

 It was my mother in law's birthday yesterday and it was a rare occasion that we got to celebrate the day with her as she lives far out by the coast.  However, this year, she's done us a lovely favour by spending a couple of weeks with us helping to look after little girl, which has allowed me to sleep in on several occasions (thank you!) and allowed several date nights for C and I (thank you!)

Given it was her birthday, and as a big thank you, I wanted to go all out with this cake! I wasn't very keen on the idea of making another chocolate cake given I just made one two weeks ago (I like to chop and change things a bit!) but C managed to convince me that this is exactly what his mum would enjoy.  
 I must admit that as I was making up a second batch of chocolate buttercream frosting to complete the layered cake, I had a moment of serious self doubt thinking that C's mum would really dislike this cake.  Like me, she's not a fan of heavy desserts and sickeningly sweet stuff, which is exactly how this cake was turning out to be, and I was kicking myself (and cursing C) for not going with my gut instinct of baking a light sponge cake with passionfruit curd (another time)!  All my doubts were put aside when C's mum had the first slice! Phew! I was so relieved!

It's no secret I am a huge fan of David Lebovitz's Devils Food Cake, which has been my go-to chocolate cake for some time now.  However, this Black Magic Cake seriously rivals the Devils Food Cake and I would even go so far as to say, it might even be better!  I came across this Black Magic Cake not long ago, when I was googling for a chocolate cake recipe that was seriously dark, almost black,  as I was intrigued at how to get chocolate cakes black in colour without it being a mud cake.  I still don't know how, but this Black Magic Cake comes very close to being black in colour. 

Apparently, this recipe has been around for decades (found here) and was created by Hersheys back in the 70s. All the reviews (and there are thousands) rave on and on about this recipe so I felt somewhat assured that this cake was going to be delicious.  And delicious it was! I made a simple chocolate buttercream frosting, which I knew would be sweet, so I reduced the amount of sugar in the cake itself to balance out the sweetness.  As a result, the cake on its own, barely tasted sweet at all. 

C's mum enjoys macarons so it was only fitting that I topped the cake with macarons (filled with rose and raspberry white chocolate ganache).  It doesn't matter how many times I make macarons, I always find them tricky, and given I don't make them regularly enough, I always forget the little tips and tricks I've learned along the way (so frustrating!).  As a result, these macarons were far from my best batch, and were riddled with flaws!  Despite this, C's mum enjoyed the macarons and that's all that mattered!

Happy birthday LM!


Wednesday, September 18, 2013

Rhubarb and ginger blondie

After a week's holiday, I have been itching to get back into the kitchen! Don't get me wrong, I loved every minute of our holiday but I can't tell you how good it feels to get my apron on and start baking again!   
When one of my favourite bloggers, Raspberri Cupcakes, posted this recipe, I knew I had to try it immediately!  Before this, I didn't know what a blondie was, so having googled it, it turns out its the blonde version of a  brownie bar.  It's got more of a cake like texture (rather than the chocolate fudgy texture of a brownie) with a butterscotch flavour to it.  I have to admit that the idea of a blondie didn't sound very appetising to me (given it's no secret that I don't like sickening sweet stuff which is exactly what a blondie sounded like).  However, the interesting combination of rhubarb and ginger got me intrigued that I was willing to give the blondie a try!
So the verdict? I love this flavour combination! I think it's a bit unusual and I doubt it will be to everyone's liking, however I liked it! There is a lot of ginger in this recipe, but I love ginger so I had no problem with this! I also like how the rhubarb had the sweet yet slightly tart flavour.  In terms of texture, I'm not sure if I got it right or if it's meant to be like this.  As I mentioned, a blondie is meant to be cake like, however these came out slightly gooey. In fact, it had that fudgy brownie like texture, which from my (limited) understanding of brownies, comes from the chocolate, although this blondie has no chocolate which is why it should have a "cake like" texture.  Anyway, given my confusion about the correctness of the texture, after taking these photos, I ended up banging them back in the oven to bake some more. It did nothing for the gooey texture, and being absent minded, I left them in way longer than I should have, so the edges of each slice came out very crispy and the rhubarb sank all the way to the bottom leaving what looked like horrible gashes in the slice! Obviously, no photos were taken of such ugly looking slices!


Friday, August 2, 2013

Sweet Honey and Mixed Nut Tart


This was originally meant to be a sweet honey and macadamia tart.  However, macadamias are ridiculously expensive and I could not bring myself to spend $30 on a bag of macadamias!  Don't get me wrong, I don't normally mind spending money on ridiculously expensive ingredients when I know that they will be consumed, but in this case, I knew that no one was going to be around to enjoy it!  Particularly as C, as testament to being my number one supporter and who has spent the past few weeks devouring my caramelised pear tart, spiced apple and ginger puddings, several servings of panna cotta, in a completely unrelated incident has just had some teeth removed (wisdom that is).  So for C, it's been a liquid diet or it should have been, but any excuse to eat ice cream for breakfast, lunch and dinner eh...! Anyway, I digress.  With no one around to enjoy this dessert, I couldn't justify spending $30 on macadamias when I knew the majority of it was going to end up in the waste.  And yes, it did cross my mind to make miniature tarts, although I always make miniature tarts and I really wanted to make a proper full blown normal sized tart for a change!
So instead of macadamias, I decided to use an assortment of nuts.  I'm in two minds as to whether this works.  On the one hand, the assortment of nuts provided slightly different flavours to the sweet honey and the shortcrust pastry, but by the same token, it detracted from the sweet honey and the shortcrust pastry! I think I would need to have the same tart with the macadamias side by side to make a proper assessment.

Making a tart reminded me exactly how much I love this sweet shortcrust pastry recipe.  I always use Guillaume Brahimi's recipe for sweet shortcrust and it never fails me.  In fact, I think it's what I love most about this tart, particularly as when the tart was baking, the honey caramel started to ooze out all over the sides of the shell, making the pastry even more yummo!
So, it's been a little under a week now since I've baked this tart and as expected, I still have over half sitting in the fridge.  As much as I enjoy eating it, I am trying to restrict the amount of sugary goodness I consume in preparation of our beach holiday and it's been a serious battle of the wills every time I open the fridge!  Seeing half the tart sitting in the fridge reminds me how much I've really consumed, so for that reason, I think its time to say good bye to this sweet honey and mixed nut tart!

Thursday, August 1, 2013

Panna Cotta

I was really nervous this panna cotta wouldn't work out.  Actually, the nerves only set in after I had made it and it was in the fridge setting.  Because during that time, I decided to google "troubleshooting panna cotta" and it was then I realised all the things that could possibly go wrong with it. You'd think I would have researched this before I set out on making it!


As it turns out, I had nothing to be worried about *phew*!  The panna cotta didn't split *happy dance*, it didn't fall away as I de-moulded it *another happy dance* and best of all, it had that beautiful wobble while still retaining its shape.  In fact, according to a friend who learnt how to make panna cotta in Italy, a good panna cotta will move elegantly with the plate while you shake the plate about, kind of like moving clay on a spinning pottery wheel.  So when I jiggled the plate about and the panna cotta wobbled with it and didn't break apart, I knew I was onto a winner!
I followed (predominantly) David Lebovitz's recipe for "perfect panna cotta".  With a title like that, I naturally expected it to turn out exactly how it sounds, which is why troubleshooting panna cotta didn't even cross my mind.  I am very pleased to say that there is nothing misleading or deceptive about David Lebovitz's title recipe.  These turned out perfectly! 

My only (slight) criticism is that I would like my panna cotta to taste a little bit more silky.  The best panna cotta I had was by our cafe chef, which was really light, delicate and silky (*mental note - I really must ask him for his recipe!).  David's recipe wasn't as light as I would have liked it to be, but that could be because I used 45% fat cream rather than 35%.   I think the next time I make these, I might also reduce the gelatin ever so slightly (beware as not enough gelatin will leave the panna cotta a goopy mess). 
I love how panna cotta is almost like a blank canvass.  The classic version uses vanilla, however, you could really play around with the flavours.  Our household always has an abundance of pomegranates (little girl's favourite fruit at the moment) so I topped the panna cotta with fresh pomegranates and crushed pistachios which gave it a really nice texture.  I also really like how these don't take long to make, setting, yes, but making it took only half an hour (and that's with me faffing about in the kitchen). 


Saturday, July 27, 2013

Spiced apple and ginger pudding


Despite the short respite we've had from the wintery cold two weeks ago, I'm still feeling the chill in the air.  So it's only appropriate that I continue with the winter warming dessert theme!  

Last weekend, I decided to spontaneously prepare a "Christmas in July" dinner which led me to baking a pie with homemade (rough) puff pastry and these little "puddings" (which I'd like to add proudly was all done in the space of 3 hours, whoa!).


These may not look like the cute little puddings I was hoping they would be.  In fact, I was rather disappointed these came out looking like plain ol' muffins (not that there's anything wrong with that - I just had a completely different vision in mind!).  I was very tempted to do individual sticky date puddings, but after a period of making (and solely consuming) sticky date cake practically every week for almost 3 months many many years ago, I guess you can say that I don't have quite the same fervour for them as I once did!

C and I started a tradition of having french toast topped with caramelised spiced apples for breakfast on Christmas morning, so I had to somehow incorporate this into our Christmas in July feast.  I decided to turn the sticky date pudding into a spiced apple pudding with cinnamon, nutmeg and ginger, topped with a butterscotch sauce.  Unfortunately, these didn't turn out that rich dark brown colour that is reminiscent of sticky date (and neither did it have that same kind of fluffiness). Despite this, they were still a hit!
These puddings/muffins (whatever you want to call them) tasted great on their own, however add the butterscotch sauce and these were absolutely delicious!  Perfect for a winter's day!

Tuesday, July 23, 2013

Caramelised Upside Down Pear Cake


Admittedly, this is not the prettiest cake I've made, but its simple, rustic, and best of all, yummy!

About a couple of weeks ago, we had our regular catch up with friends over a home cooked meal and with the weather being so cold recently, it felt appropriate to bake something that was warming and homely. What's more winter warming than a caramelised upside down pear cake! 


This is the kind of cake that I imagine a nanna would make served with a cup of earl grey tea.  It's moist with just the right of amount of sweetness.  It's known that I don't have a big sweet tooth so this cake was just perfect for me.  You could easily have a second slice without feeling overly indulgent, which is exactly what I did, with a cup of tea of course!
This is a really easy cake to make.  Cut the pears, place them into the cake tin, pour the mixture over the pears and let it all bake in the oven.  It does, however, take a long time to bake.  The first time I made this cake, it took almost 2 hours in the oven so do ensure you leave loads of time for cooking.  The second time around (as shown in these pics), I cranked up the oven temperature and ended up baking for 1 hour 20 minutes - although it could have benefited from a bit longer in the oven, as the buttery caramel will crisp up the sides of the cake. 


Monday, February 25, 2013

Chocoate caramel brownie


It was a brownie bake off weekend! Actually I had nothing to do with the bake off so I can't claim any credit - this was a bake off between C and a work friend who we fondly call Frenchie! Over the week, C was telling Frenchie how he was planning on baking brownies over the weekend to which Frenchie claimed she could bake a mean brownie.  Hence the challenge was set!   A salted caramel chocolate brownie bake off!

These brownies were delicious, although the only complaint was that C was a bit over zealous with the salt.  I happen to love salt, and salt with chocolate taste amazing, so I didn't mind the saltiness.  This recipe called for salt flakes to be lightly dusted on top of the brownie, however, we didn't have any salt flakes, only salt rocks! So when you bit into a salt rock, it could be quite intense! 


So the winner ...? Frenchie! While I absolutely love the flavour of the brownie C baked, Frenchie actually had the correct texture of the brownie.  Although C followed the recipe to a tee, he later discovered from our chef friend (one of the judges) that he must have set the oven temperature too high, hence the brownie came out a bit "cake" like.

Anyway, brownies are one of those treats that I will allow myself once in a blue moon - only because they are so so deadly and I can never stop at one slice! In my opinion, they're one of the best comfort food.  Except this time, I had no reason to be comforted so these were purely an indulgent treat! My waistline was very grateful when C gobbled up the last bit of the brownie before I could!