Sunday, September 23, 2012

Pink Ombre Cake

Oh my gosh, I am absolutely in love with this cake! It is pink and it is pretty, and I love love love!

When I first saw an ombre cake, I thought they were so pretty that I decided that I would make one for baby girl's birthday! Well baby girl is almost turning one and over the weekend, we held a birthday cake smash for her with this pink ombre cake being the centre piece.

The idea behind the cake smash is that baby girl is meant to smash the cake into pieces (duh, it's exactly how it sounds)!  It's supposed to be fun and messy!  I had a vision of her getting her hands literally stuck into the cake with cake and cream all over her face and body and well, basically everywhere! It sounds so deceptively simple doesn't it! Well I never would have guessed in a million years that baby girl would be terrified of cake.  She would not go anywhere near it, let alone smash it!

So the cake smash didn't go to plan :( Unfortunately, we weren't able to capture photos of baby girl with a big grin on her face with cream all over her mouth and body as I had imagined.  Instead, we got photos of her sitting next to the cake crying and crawling away from the cake in terror!  Just as priceless!  

Her being so scared of the cake did solve my dilemma of being able to take a photo of a clean slice of the cake to show the beauty of the layers!
So the cake is a simple vanilla sponge cake (you can use any sponge recipe).  I used the Wilton rose colour to get the varying shades of pink although for the bottom layer, I added a touch of red in order to get it really dark.  In hindsight, I don't think I needed it.  The trickiest part of baking this cake is getting the colouring just right. 
So I divided my cake mixture into four bowls and added a little bit of colouring to each to get the varying shades of pink.  You always start with a little bit of colouring first as you can always darken it later.  So the second darkest layer you see was originally my darkest layer.  I had baked that layer first and when I saw how the intensity reduced having baked in the oven, I grabbed the lightest batter and went crazy with the food colouring.  I didn't intend it for it to turn out hot pink but I'm glad I did as I knew it needed to be really intense in order to distinguish the layers. 
I am really happy with how the sponge turned out.  Since I am not so great at trimming sponges to get it level, I was determined to get the sponge to bake evenly so I wouldn't get the dome you usually get in the middle of the cake.  I read that if you wet some old tea clothes and wrap it around the cake tin, that should help the cake cook evenly as it's always the sides that get cooked first (hence the dome).
 
I was so pleased it worked! So I didn't have to level the cake by cutting it! *happy dance* 
You can see in the top left corner where baby girl managed to just touch the cake!

As for the frosting, I used a plain Swiss meringue buttercream.  It's my favourite frosting (aside from cream cheese frosting).  Similar to the sponge, I divided the frosting into different bowls and gradually added a bit of food colouring, making sure that there was more of the lightest colour frosting as that would also cover the top of the cake.
I didn't really judge the quantity well as I ran out of the lightest colour frosting and ended up having to pipe a few swirls here and there with some of the darker colour frosting.
   
Not only is this cake so darn pretty, it taste darn good too! I absolutely love love love this cake!

Saturday, September 15, 2012

Pear Tarte Tatin

This is a simple tarte tatin made with puff pastry.  There's a bit of debate as to whether a tarte tatin should be made with a shortcrust kind of pastry and I can see why as the caramel really softens the puff.  But I think whatever base you use, the tarte tatin for me is all about the sweet caramel buttery pears (or apples or whatever fruit you choose).
The recipe I used is a Gordon Ramsay recipe which jazzes up the traditional tarte tatin by including additional spices (recipe can be found here) such as cinnamon and cardamon.  I included a vanilla bean as it goes so well with these spices.  
 
I'm not sure whether the tarte tatin is supposed to be so syrupy, in fact, I don't think it is, as it does ruin the pastry but I quite enjoyed it, particularly when eaten with vanilla ice-cream - yum!  I definitely will try this one again, perhaps with a different base, as the flavours were delicious.  Oh, and a tip if you're not a fan of the sogginess - use fruit which is firm, so here in Australia, I used the Packham Pears which are usually crunchier than the rest.  And you can prepare the pears (or apples) a day ahead, leaving them uncovered in the fridge - this helps to dry them out.   


Monday, September 10, 2012

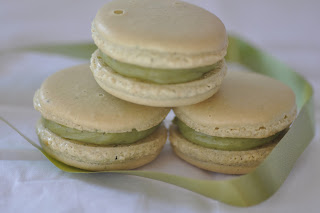
Pistachio Macarons

 
It has been a hell-ish kind of week, one that could not have been anticipated.  Anyone who has had to nurse a sick baby will know exactly what I mean!  I was even super organised with my baking, having baked two different kinds of macarons for father's day with the intention of making two blog posts out of one baking session!  Just as well I did that, as I didn't even get a chance to post this blog until now!

On to these macarons! Whenever C and I get gelati, we always get the unbeatable combo of coffee and pistachio.
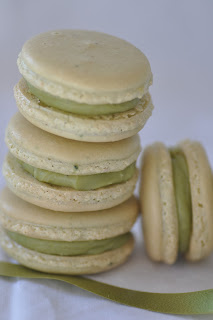
I was so excited about testing out the avocado green food dye I bought recently.  Except that the colour didn't really come through in the macaron shell.  I only put in the smallest drop of food colouring so if I hadn't burnt the shells, you would have seen the subtle pistachio colour.  Instead, the shells turned a very light sand colour thanks to me completely forgetting the macs were in the oven baking!
The intensity of the colour of the ganache makes up for the shells! It was purely an accident though as instead of squirting out only a few drops of colouring, I ended up squirting practically the whole bottle!
And as per the coffee macarons, I only just needed the ganache to mellow out the shells so after a few hours of sitting there, these macs had the perfect crunch and chewiness.


Sunday, September 2, 2012

Coffee Macarons

Happy father’s day to all the dads out there! Today is C’s first father’s day and I really wanted to make it memorable! It’s been a crazy busy week, in fact, most weeks have been that way now and yep, I am falling behind in my weekly baking posts! Oh well, it was bound to happen!

C loves coffee and anything coffee flavoured (just as well since he does run his own cafe) so I wanted to make him coffee flavoured macarons.  
 
I had to whip up this batch in the spare few minutes I had (which seems to be the story of my life so far!) and while I’m pleased with how these macarons look, I’m not entirely happy with their texture.*  Argh! It just goes to show that no matter how many times I make macarons, they cannot be rushed!

The coffee ganache is delicious however! I ended up just eating the leftover ganache on it’s own.  Just as well I went for a run afterwards hehe! 

Anyway, happy father’s day C! You are an amazing father to our baby girl!
*PS -  The texture turned out perfectly - I just needed to let these macarons rest a good couple of hours so that the ganache softened the shell.  Overall, really happy with how these macs turned out!